How to Request a New Call
1. Complete the New Call Request Form.
- Indicate your payment preference (Visa/Mastercard, Check, Already Paid, Auto-Deduct).
- Enter a new billing address, if changed.
- Enter the basic details of your call. Be sure to provide the most accurate and complete information on the call form. The CaFÉ team will enter the base details as provided.
2. The CaFÉ team will add your call template to CaFÉ.
- We will notify you when the call is ready for you to edit.
3. Submit payment.
- If paying upfront, you will receive an invoice to pay for the call.
- Payment MUST be received before your call can be published.
IMPORTANT: You may not re-use old calls to accept new entries. New calls must be requested and purchased prior to being set up.
How to Edit Your Call Details
1. Locate the Call Editor.
- Select Events then Management from the menu on the left-hand side of your screen.
- Choose your call in the Current Events drop-down menu and then click the green Call Editor button.
- Be sure Event Information is selected.
Note: Click Save Section to save changes in each section as you go. Click Save Call at the top or bottom of the page to save changes to all sections at once.
2. Enter your organization details and contact information.
Fields in bold are required.
Hover over the blue (+) icons to view the details of each field:
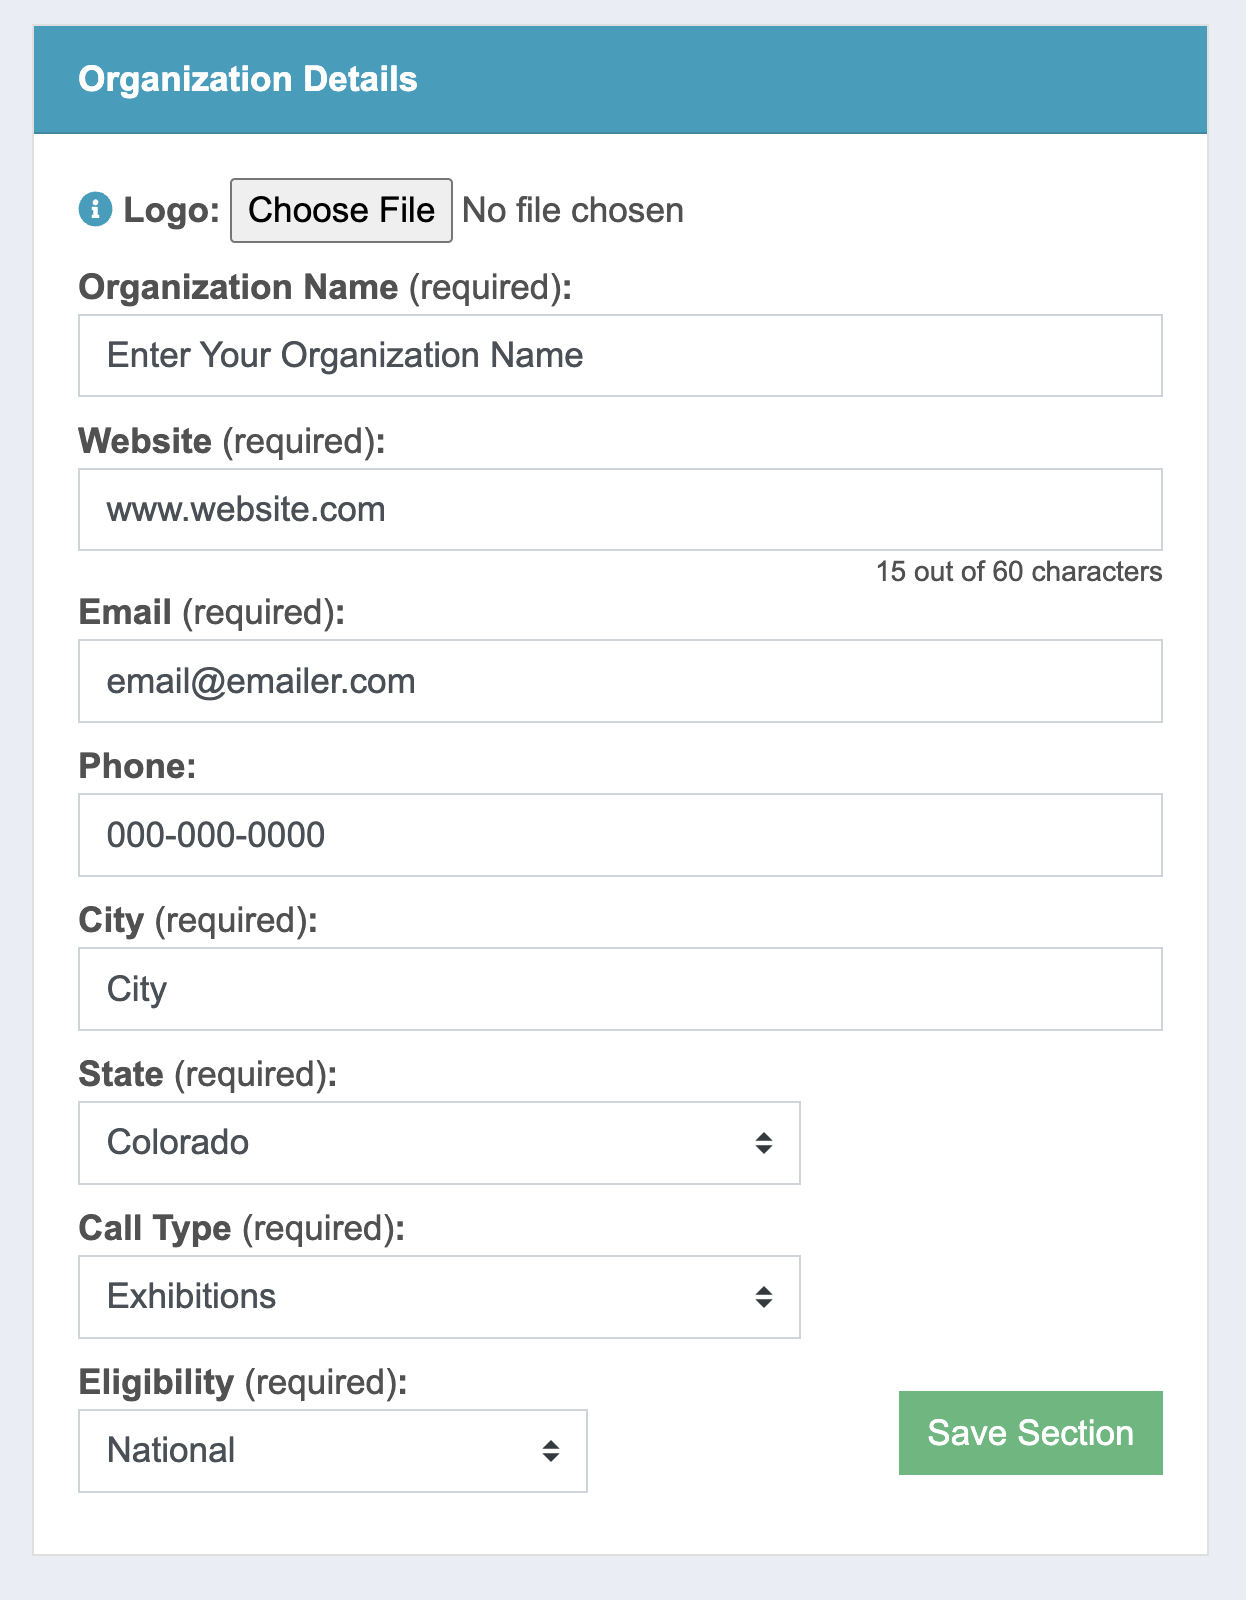
Upload a JPG or GIF no larger than 300 pixels on the longest edge. To upload, click Choose File and select your file. Click Save Section to load the image onto the call form.
Enter the name of your organization.
Enter your organization’s website address.
Enter an email where applicants may contact you.
Enter a phone number where applicants may contact you.
Input the city where your event is located.
Choose the state where your call or event is located.
Used as a search parameter. Choose the call type that most closely aligns with your event.
Used as a search parameter. Choose the eligibility status for your applicants or select “unspecified” if you do not have geographic eligibility requirements.
3. Enter the call listing details.
Fields in bold are required.
Hover over the blue (+) icons to view the details of each field:
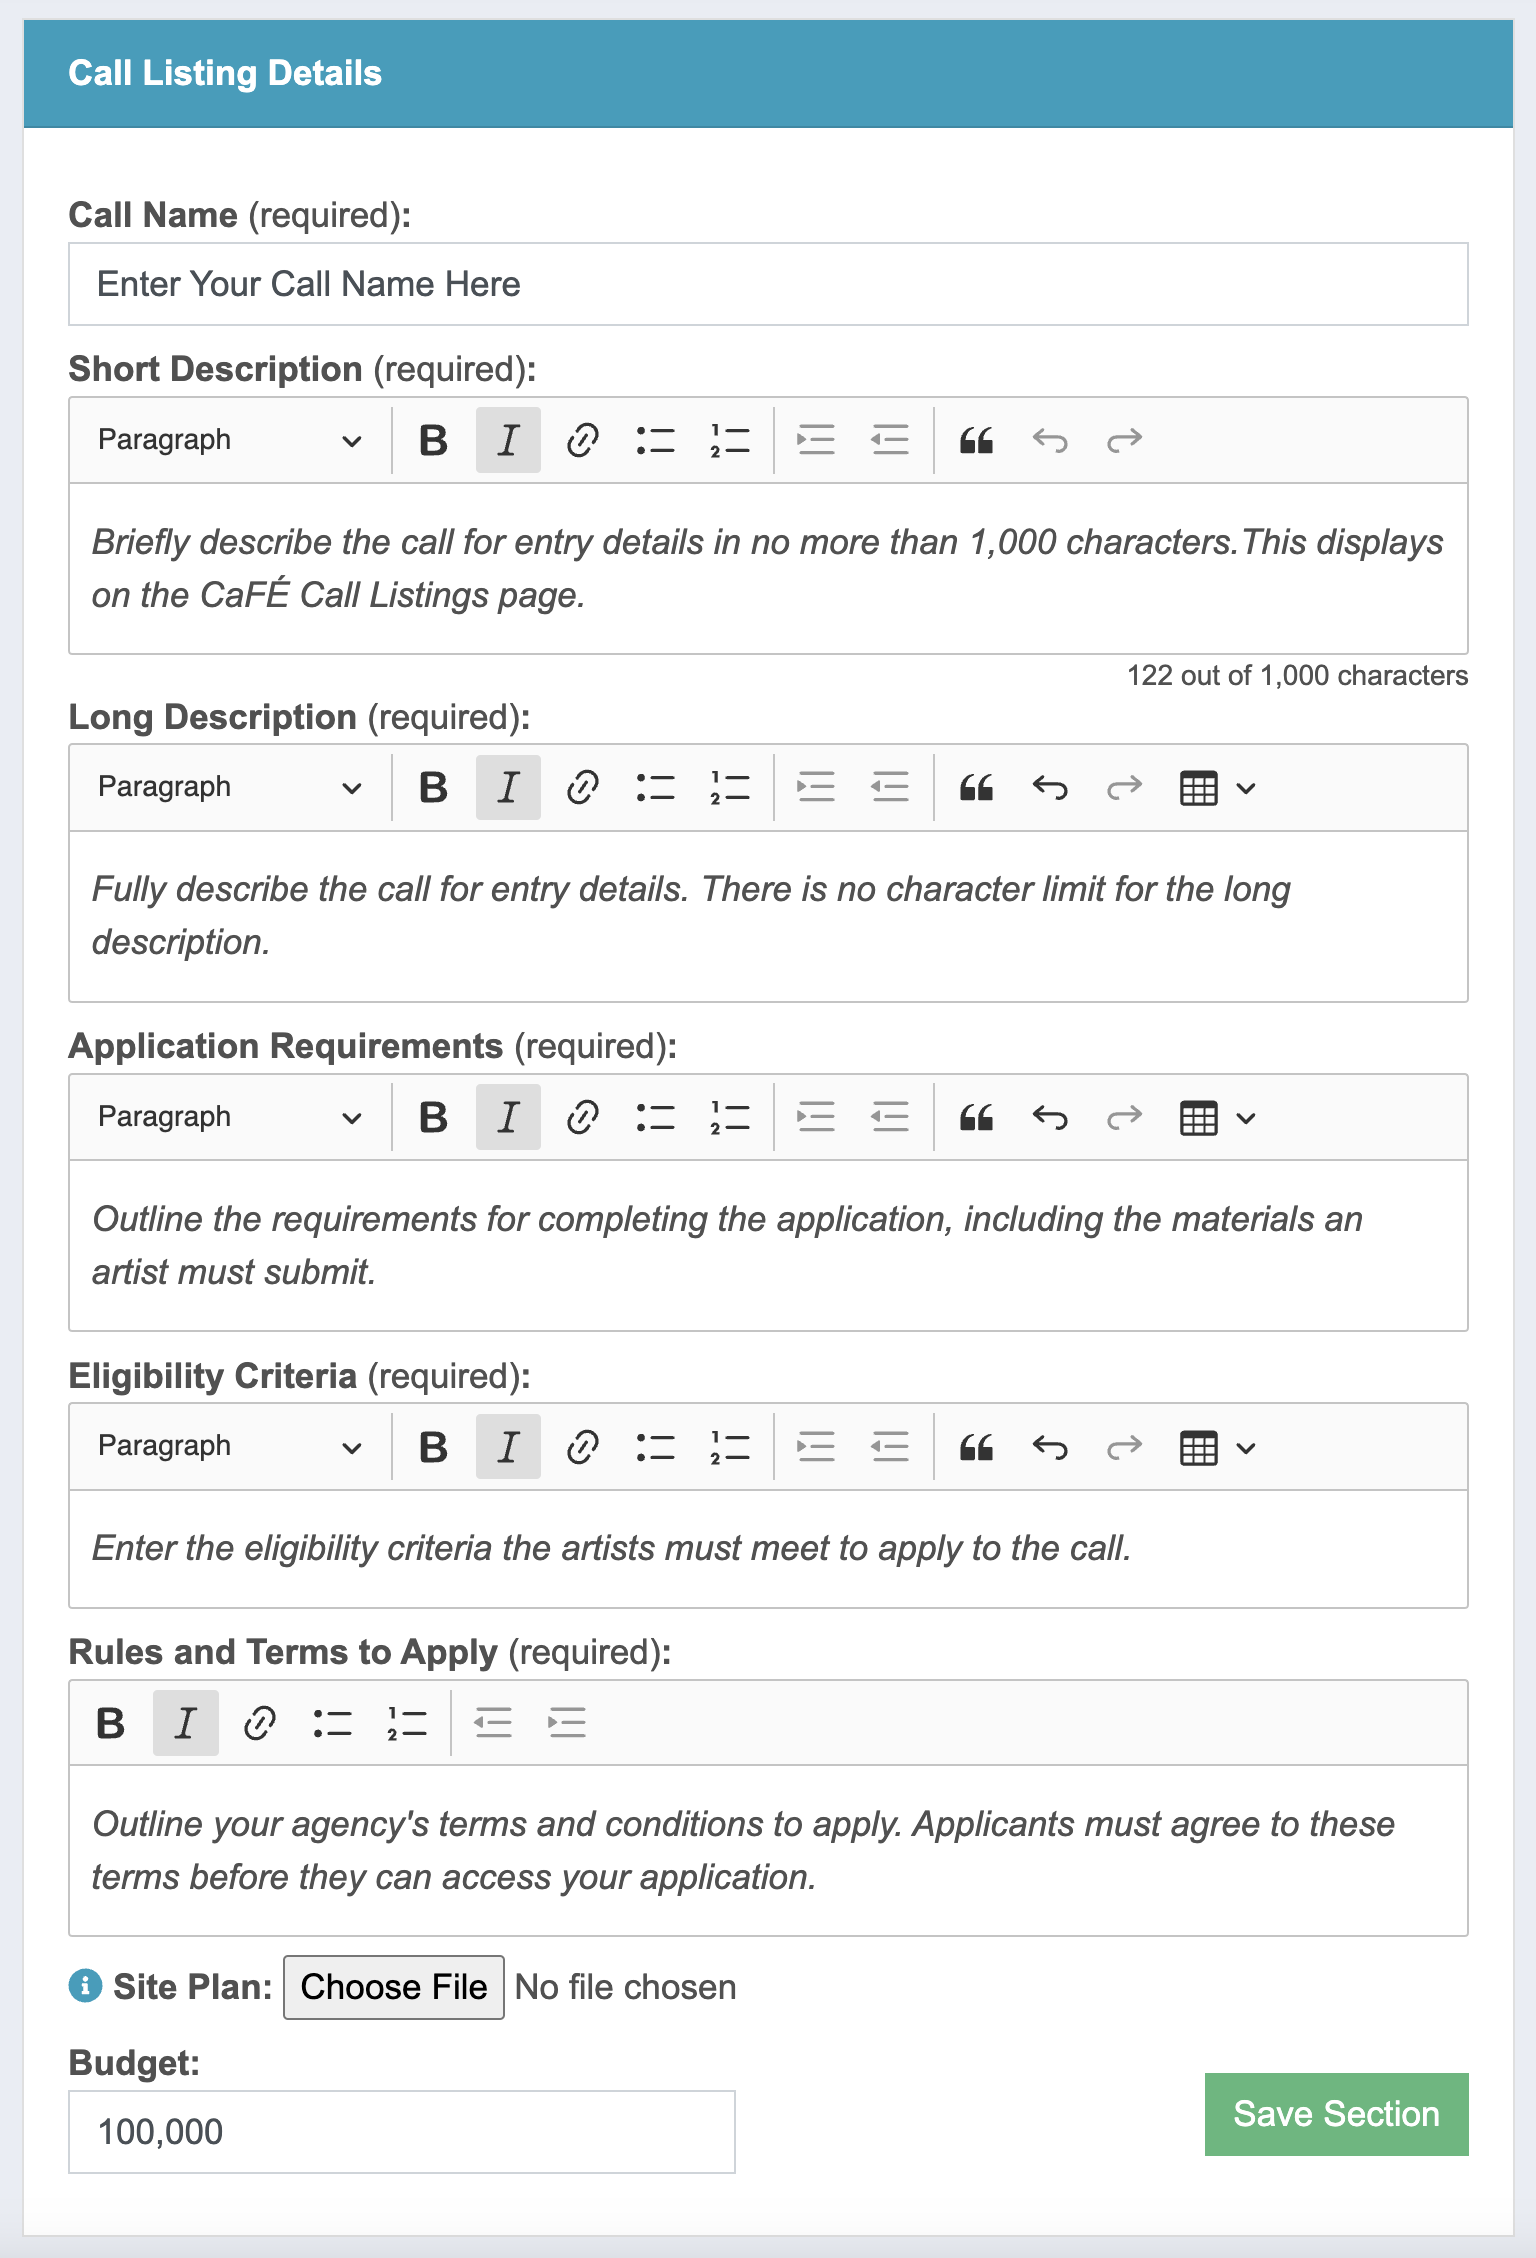
This is the title of the call as it will appear on CaFÉ. Short titles display best on mobile devices.
Briefly describe the call for entry details in no more than 1,000 characters. Text that exceeds 1,000 characters will be truncated when displayed to artists in the Call Listings page.
Fully describe the call for entry and event details. There is no character limit for the long description.
Outline the requirements for completing the application, including the materials an artist must submit (e.g. resume, references, media requirements, etc.)
Enter the eligibility criteria the artists must meet to apply to the call.
Outline your agency’s terms and conditions to apply. Applicants must agree to these terms before they can access your application.
If applicable, upload a floor or site plan (JPG or PDF only) no larger than 2 MB. To upload, click Choose File and select your file. Click Save Section to load the file onto the call form.
If applicable, enter the project budget that will be granted to the selected artist (typically used for public art calls).
4. Select all applicable dates for your event.
Hover over the blue (+) icons to view the details of each field:
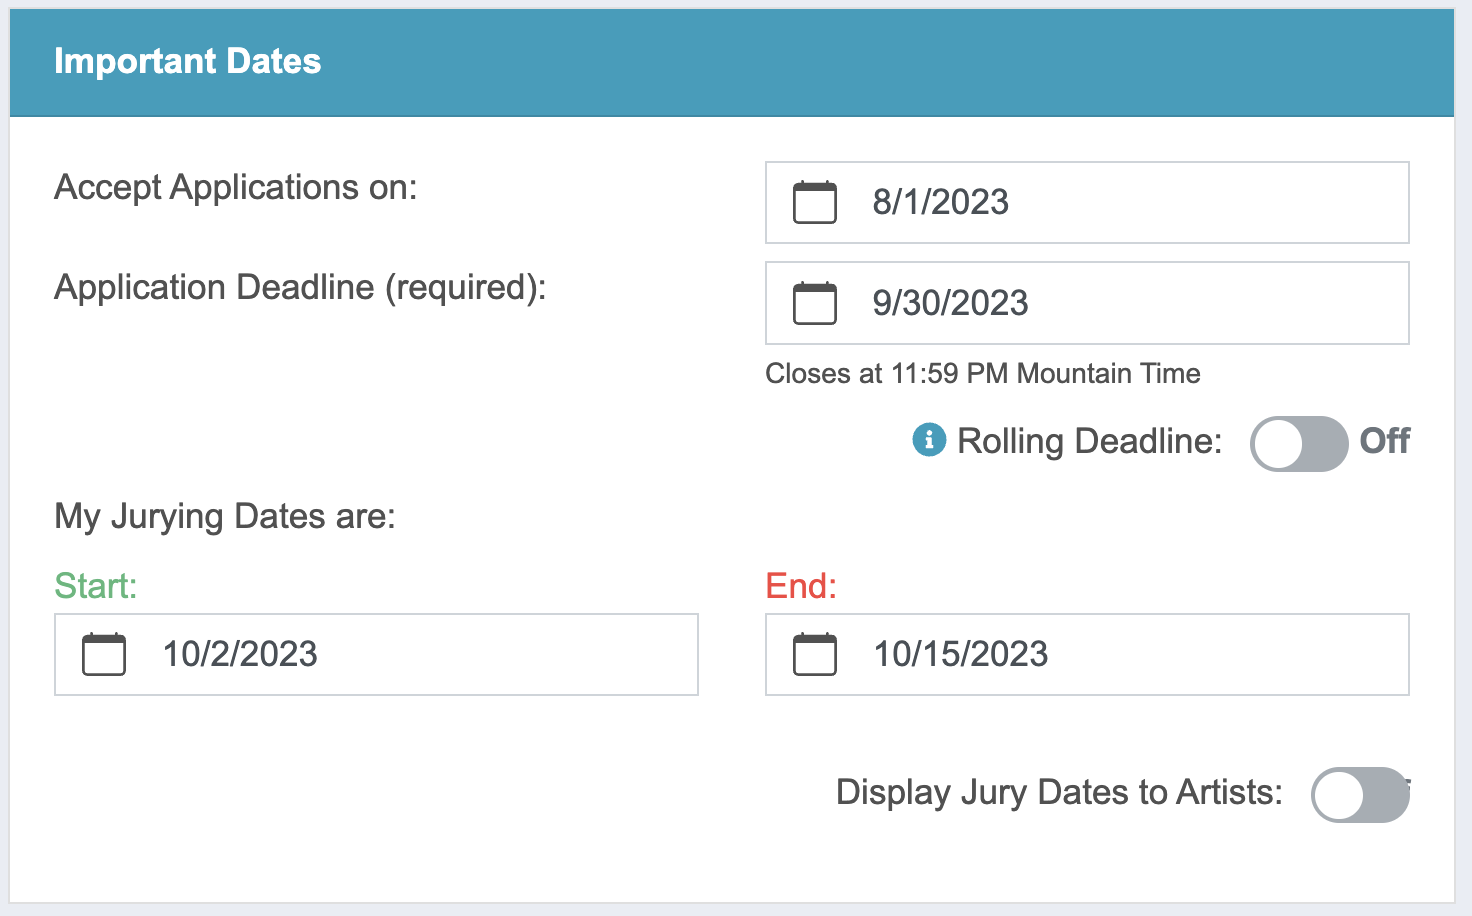
This is the date you will begin accepting applications. Once your call is published, artists can apply starting on your Accept Applications date.
Use the Rolling Deadline if you will accept applications during an extended, ongoing term. Limited to no longer than a 12-month term. Contact the CaFÉ team to activate this feature.
Set a date applications must be submitted by. Applications close at 11:59 p.m. Mountain Time on the deadline date. Email the CaFE team at cafehelp@westaf.org if you need to extend the deadline date after the original deadline.
Set the begin and end dates of the panel.
Toggle to On if you would like artists to see the jury dates for your call.
5. If applicable, adjust additional settings.
Hover over the blue (+) icons to view the details of each field:
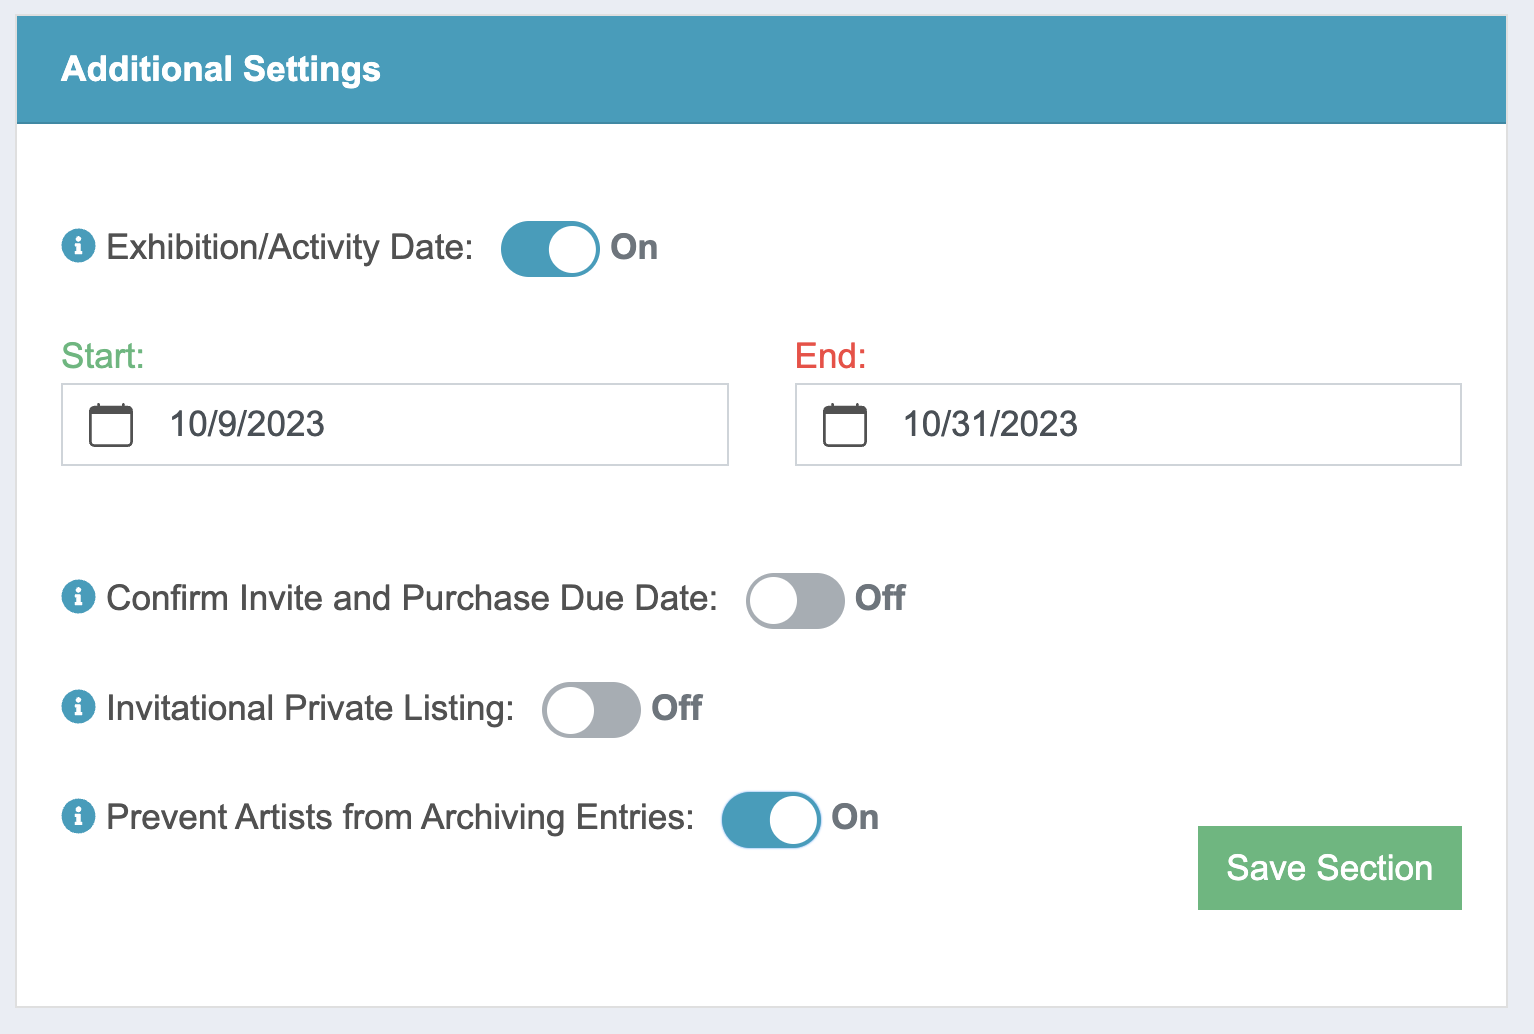
Enter the dates of your exhibition, event, or activity (e.g. opening and closing exhibition dates, workshops dates, residency dates, etc.).
Toggle to On only if juried and invited applicants will owe you an additional fee to participate.
Toggle to On if your call is not open to the public and you will be inviting a private list of applicants. Once active, create a passcode to be shared with your invitees.
This setting determines when your applicants can archive their entries. Turn off once your jury is complete to allow applicants to archive and keep their list of entries current.
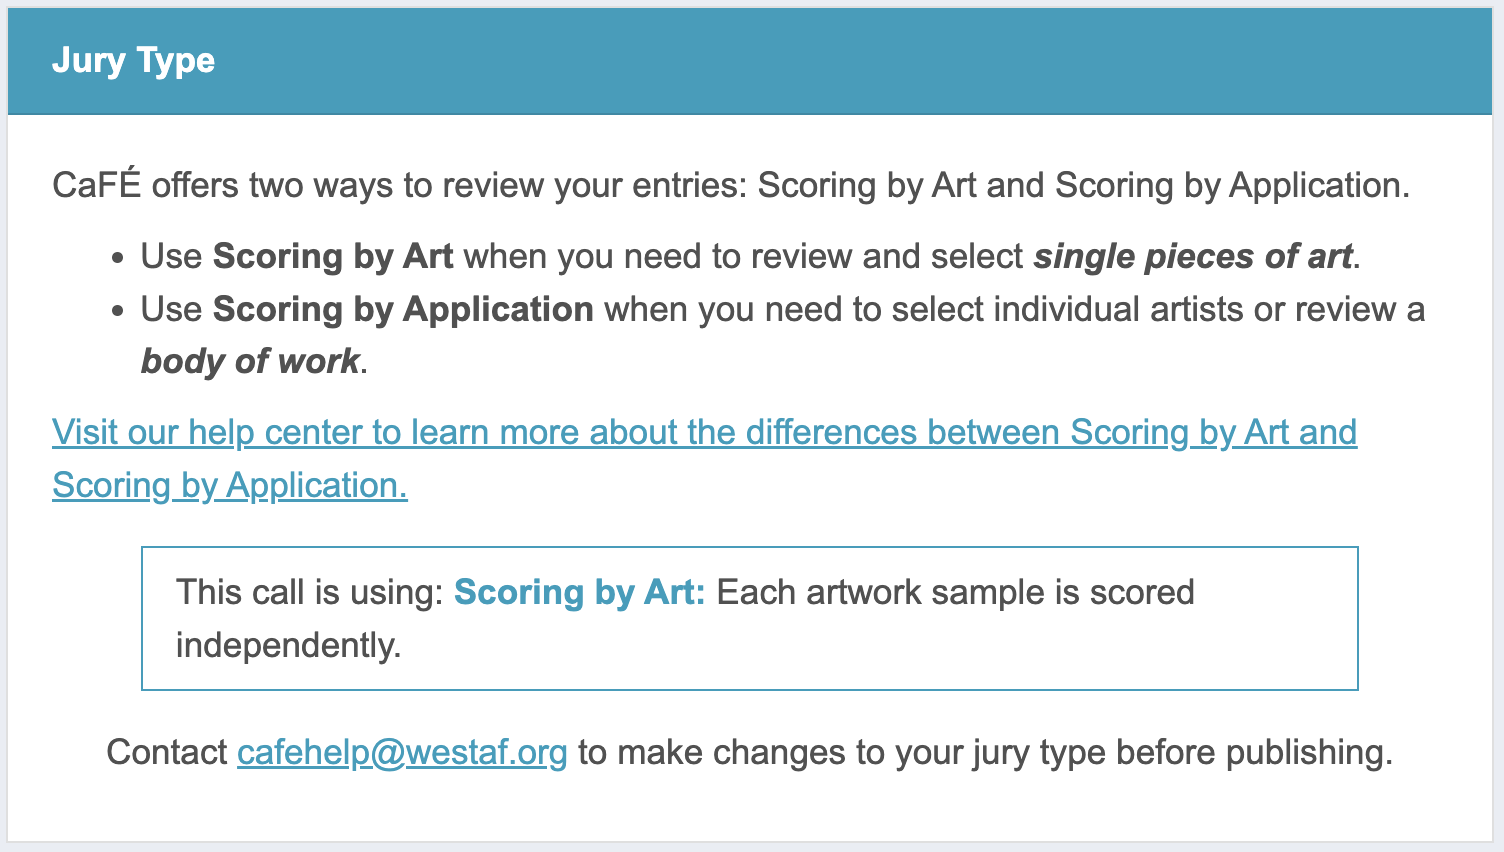
6. Verify the Jury Type is correct.
It’s important to ensure you have the correct jury type before you publish your call. Contact the CaFÉ team to change this setting.
7. Preview your call details.
Click Preview Call to review the information as it will appear to artists.
8. Save and continue.
Click Save Call to save changes to all sections. Continue to the Application Editor tab at the top of the page to build your application.
Application Editor Tab
How to Build Your Application
1. Locate the Application Editor.
- Select Events then Management from the menu.
- Choose your call in the Current Events drop-down menu.
- Click Call Editor.
- Click on the Application Editor tab.
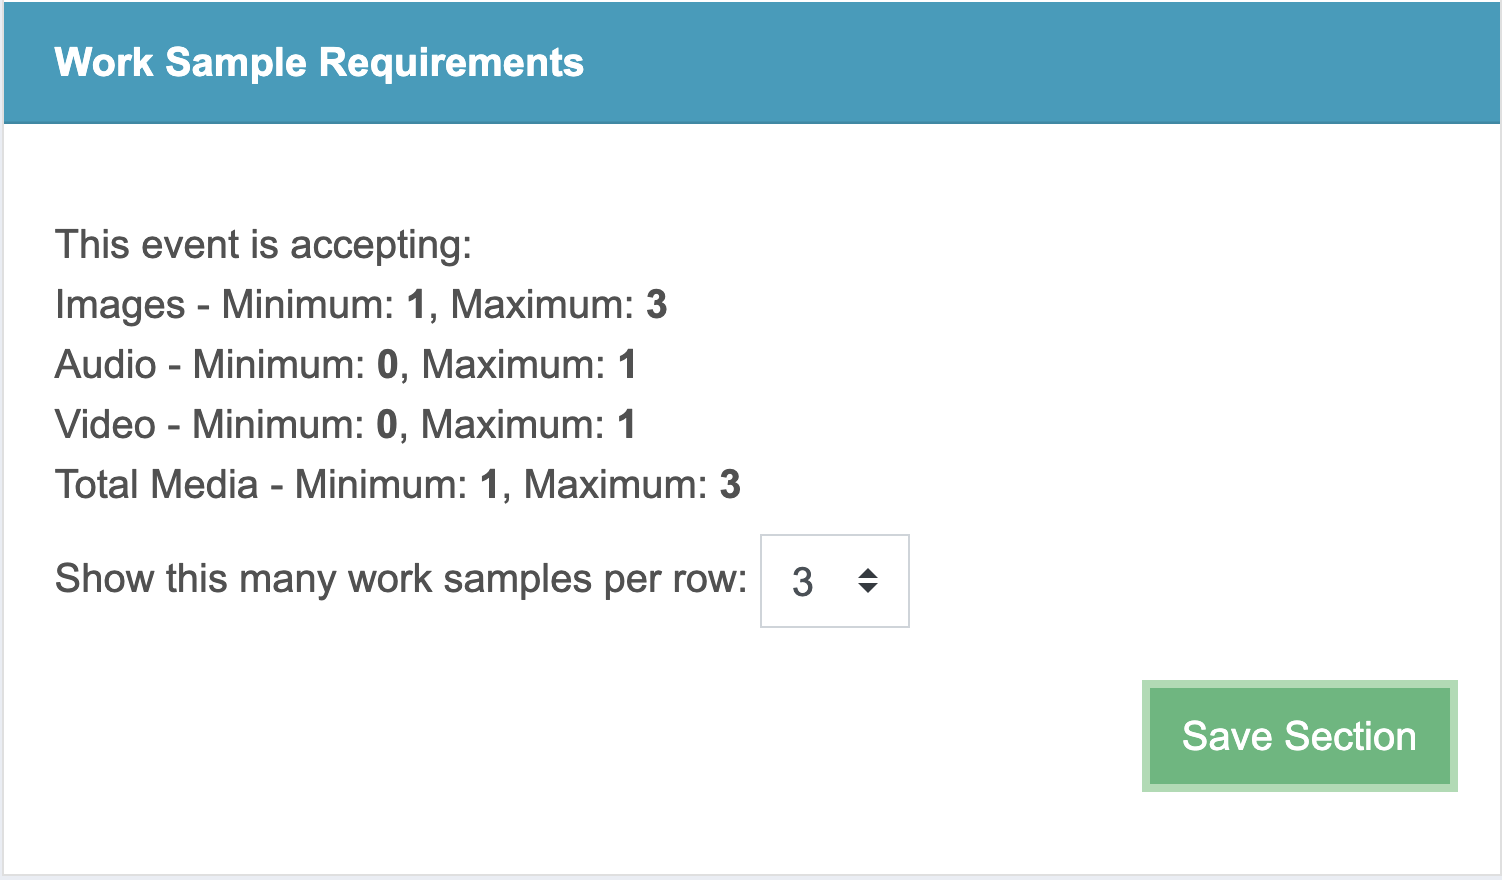
2. Verify the Work Sample Requirements are correct.
- Your work sample requirements indicate how many images, audio samples, and video samples can be submitted, if applicable.
- Contact us if you would like to change these requirements. This cannot be changed after the call opens.
Note: Click Save Section to save changes in each section as you go. Click Save Call at the top or bottom of the page to save changes to all sections at once.
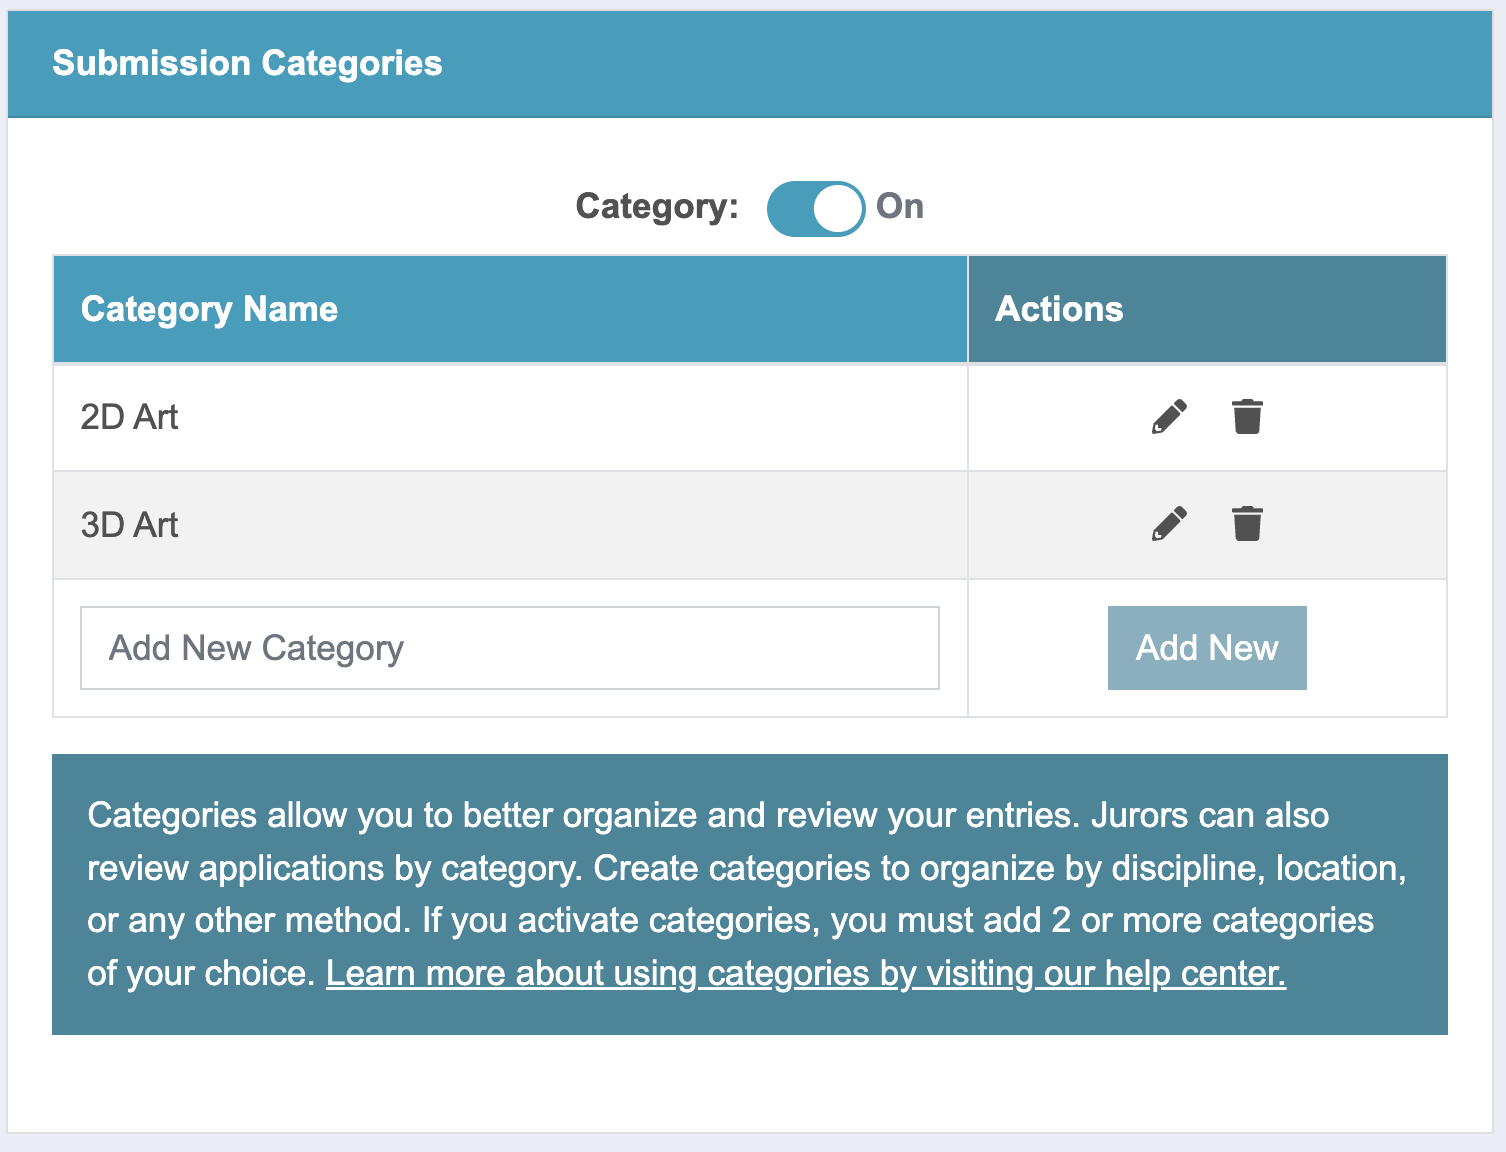
3. Set up Submission Categories, if needed.
Applicants will select their category from the list of options. Jurors will be able to view and score by category.
- To activate, toggle the Category setting to On.
- Enter the category name in the empty field and click Add New.
- Repeat to add at least two categories.
- Click the pencil icon to edit an existing category. Click the save icon to save changes.
- To remove a category, click the trash icon.
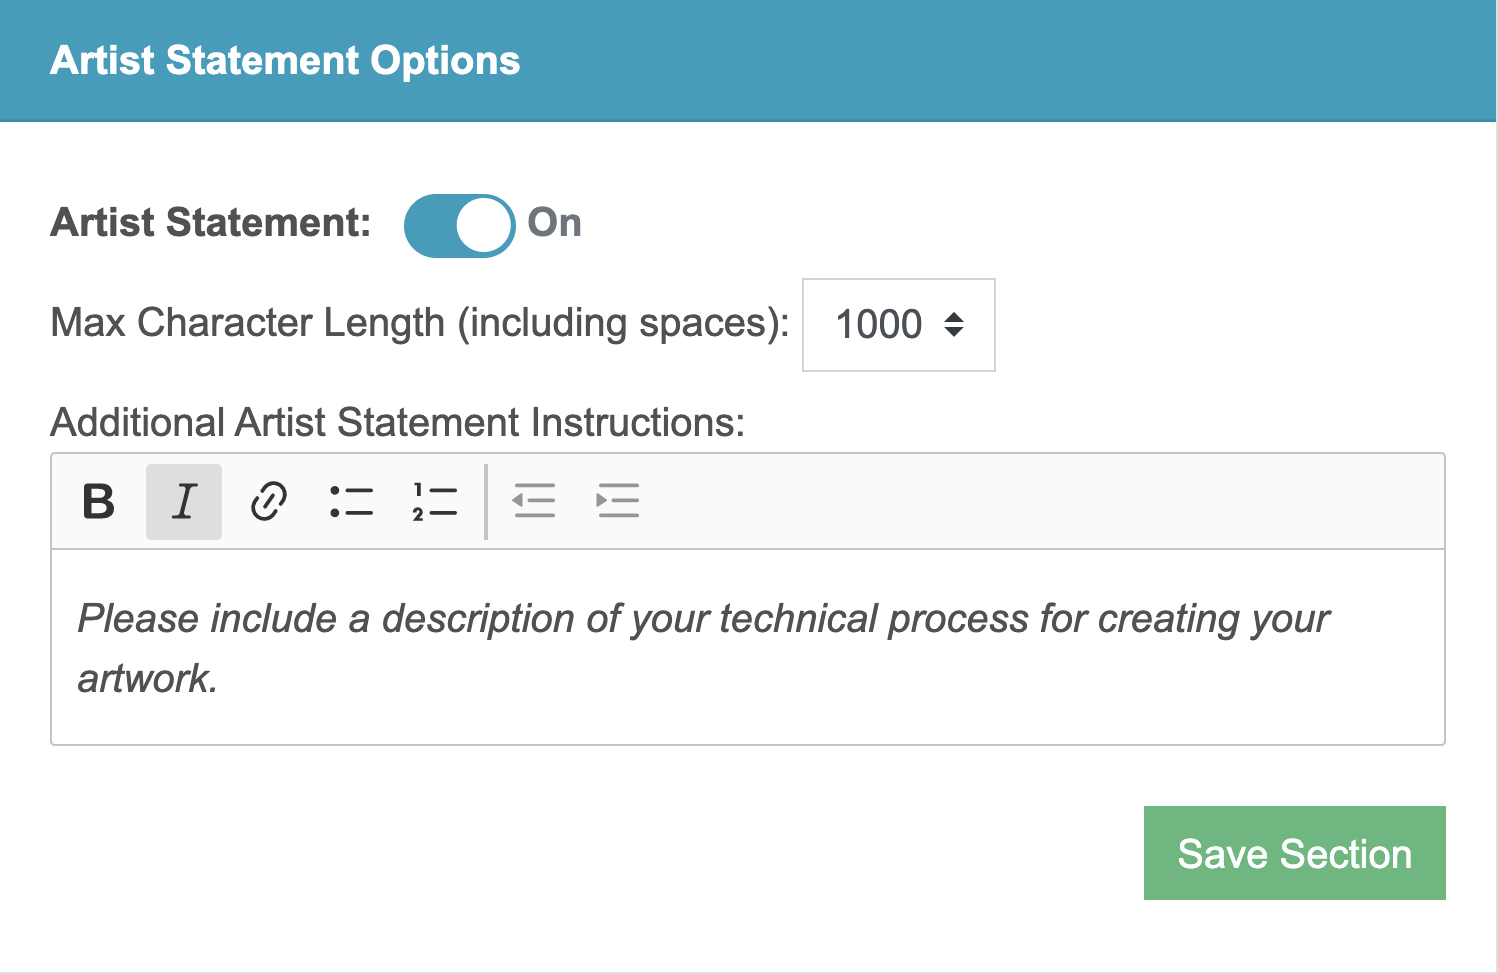
4. Choose your Artist Statement Options.
- To collect artist statements, toggle the Artist Statement setting to On.
- Choose a Max Character Length (1,000-5,000).
- If applicable, enter Additional Artist Statement Instructions.
- If you are not collecting artist statements, toggle the Artist Statement setting to Off.
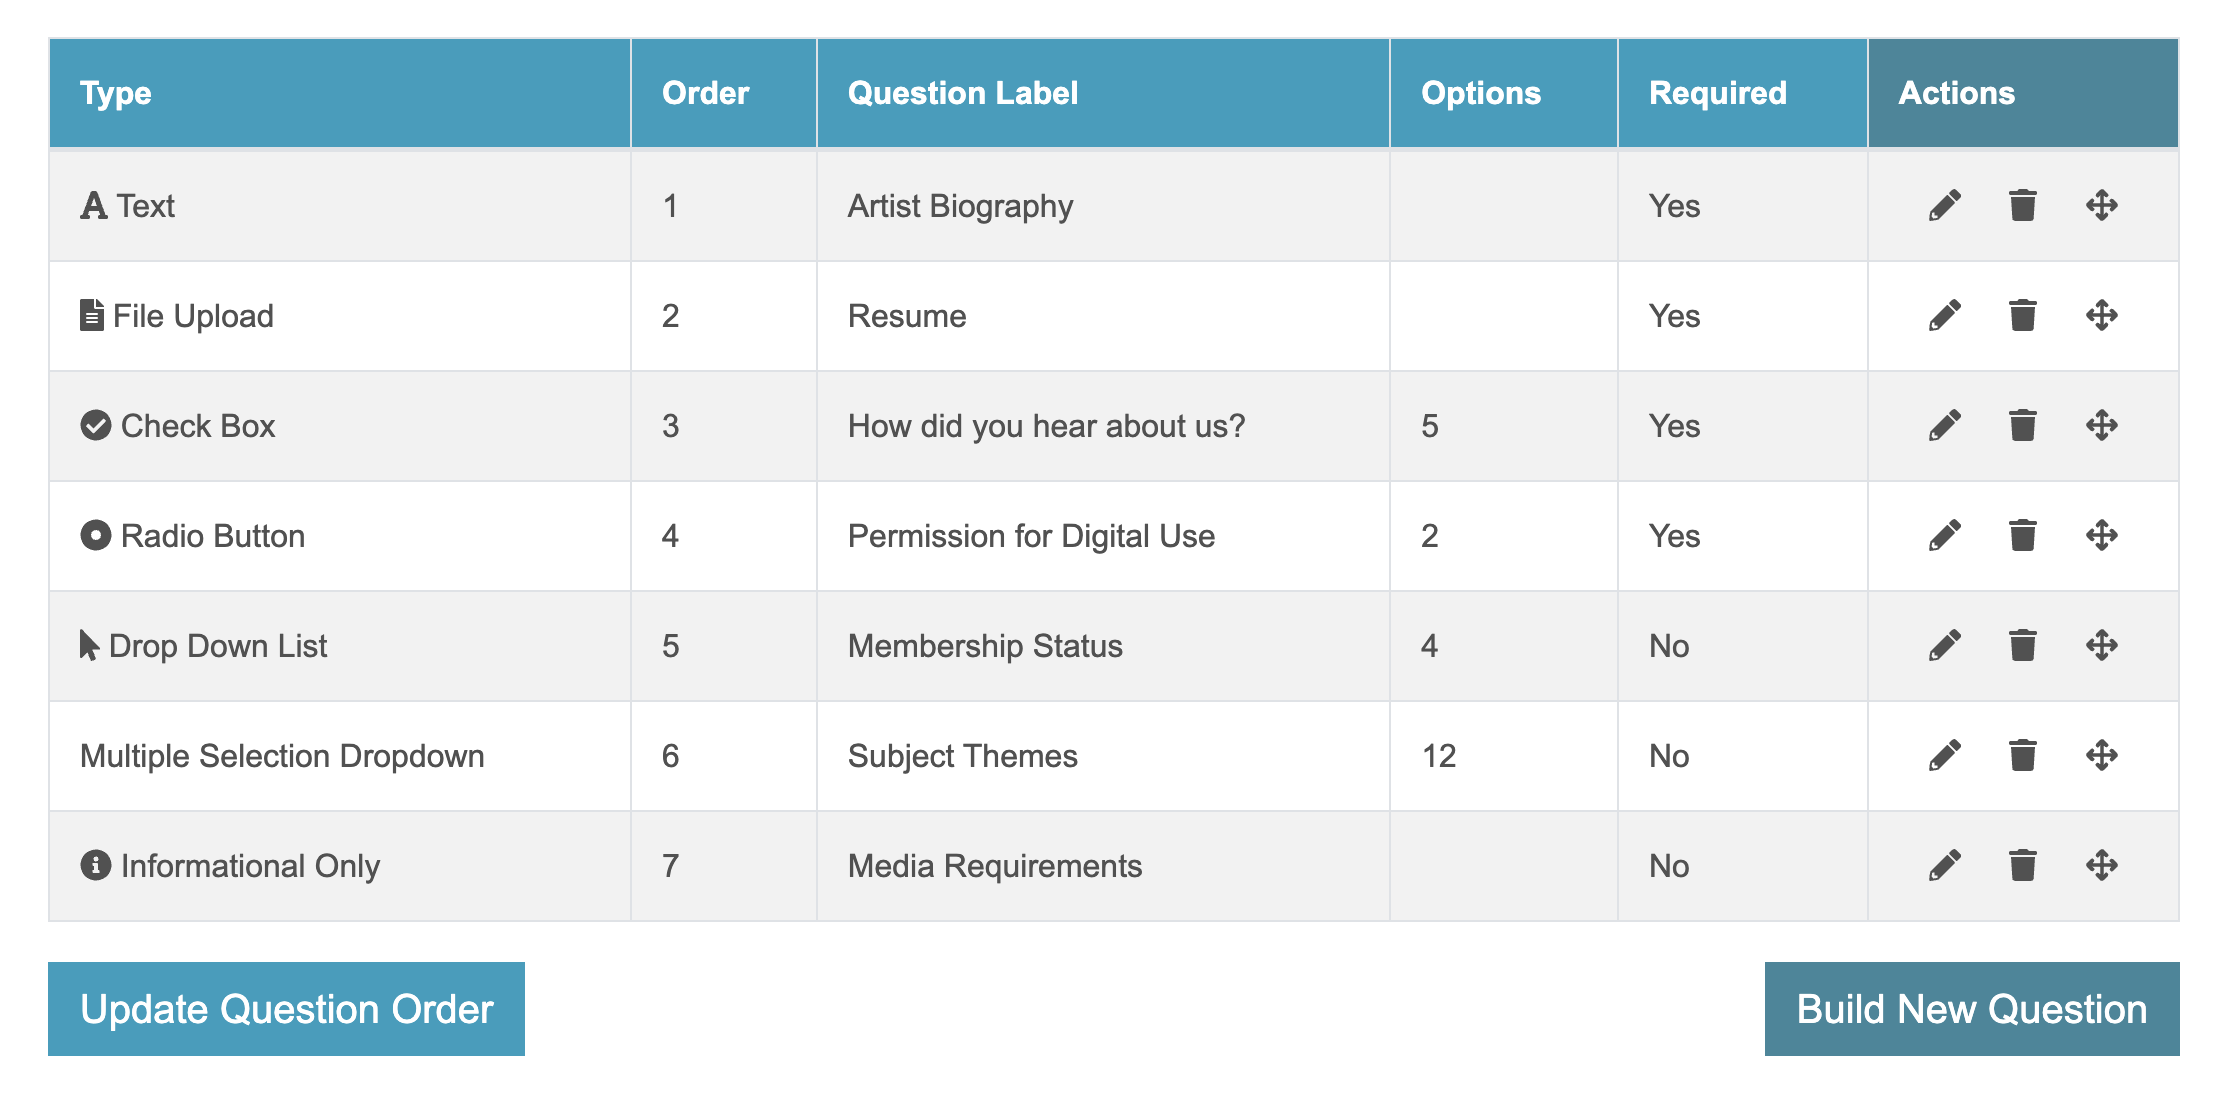
5. Build Custom Form Questions.
Create an unlimited number of application form questions.
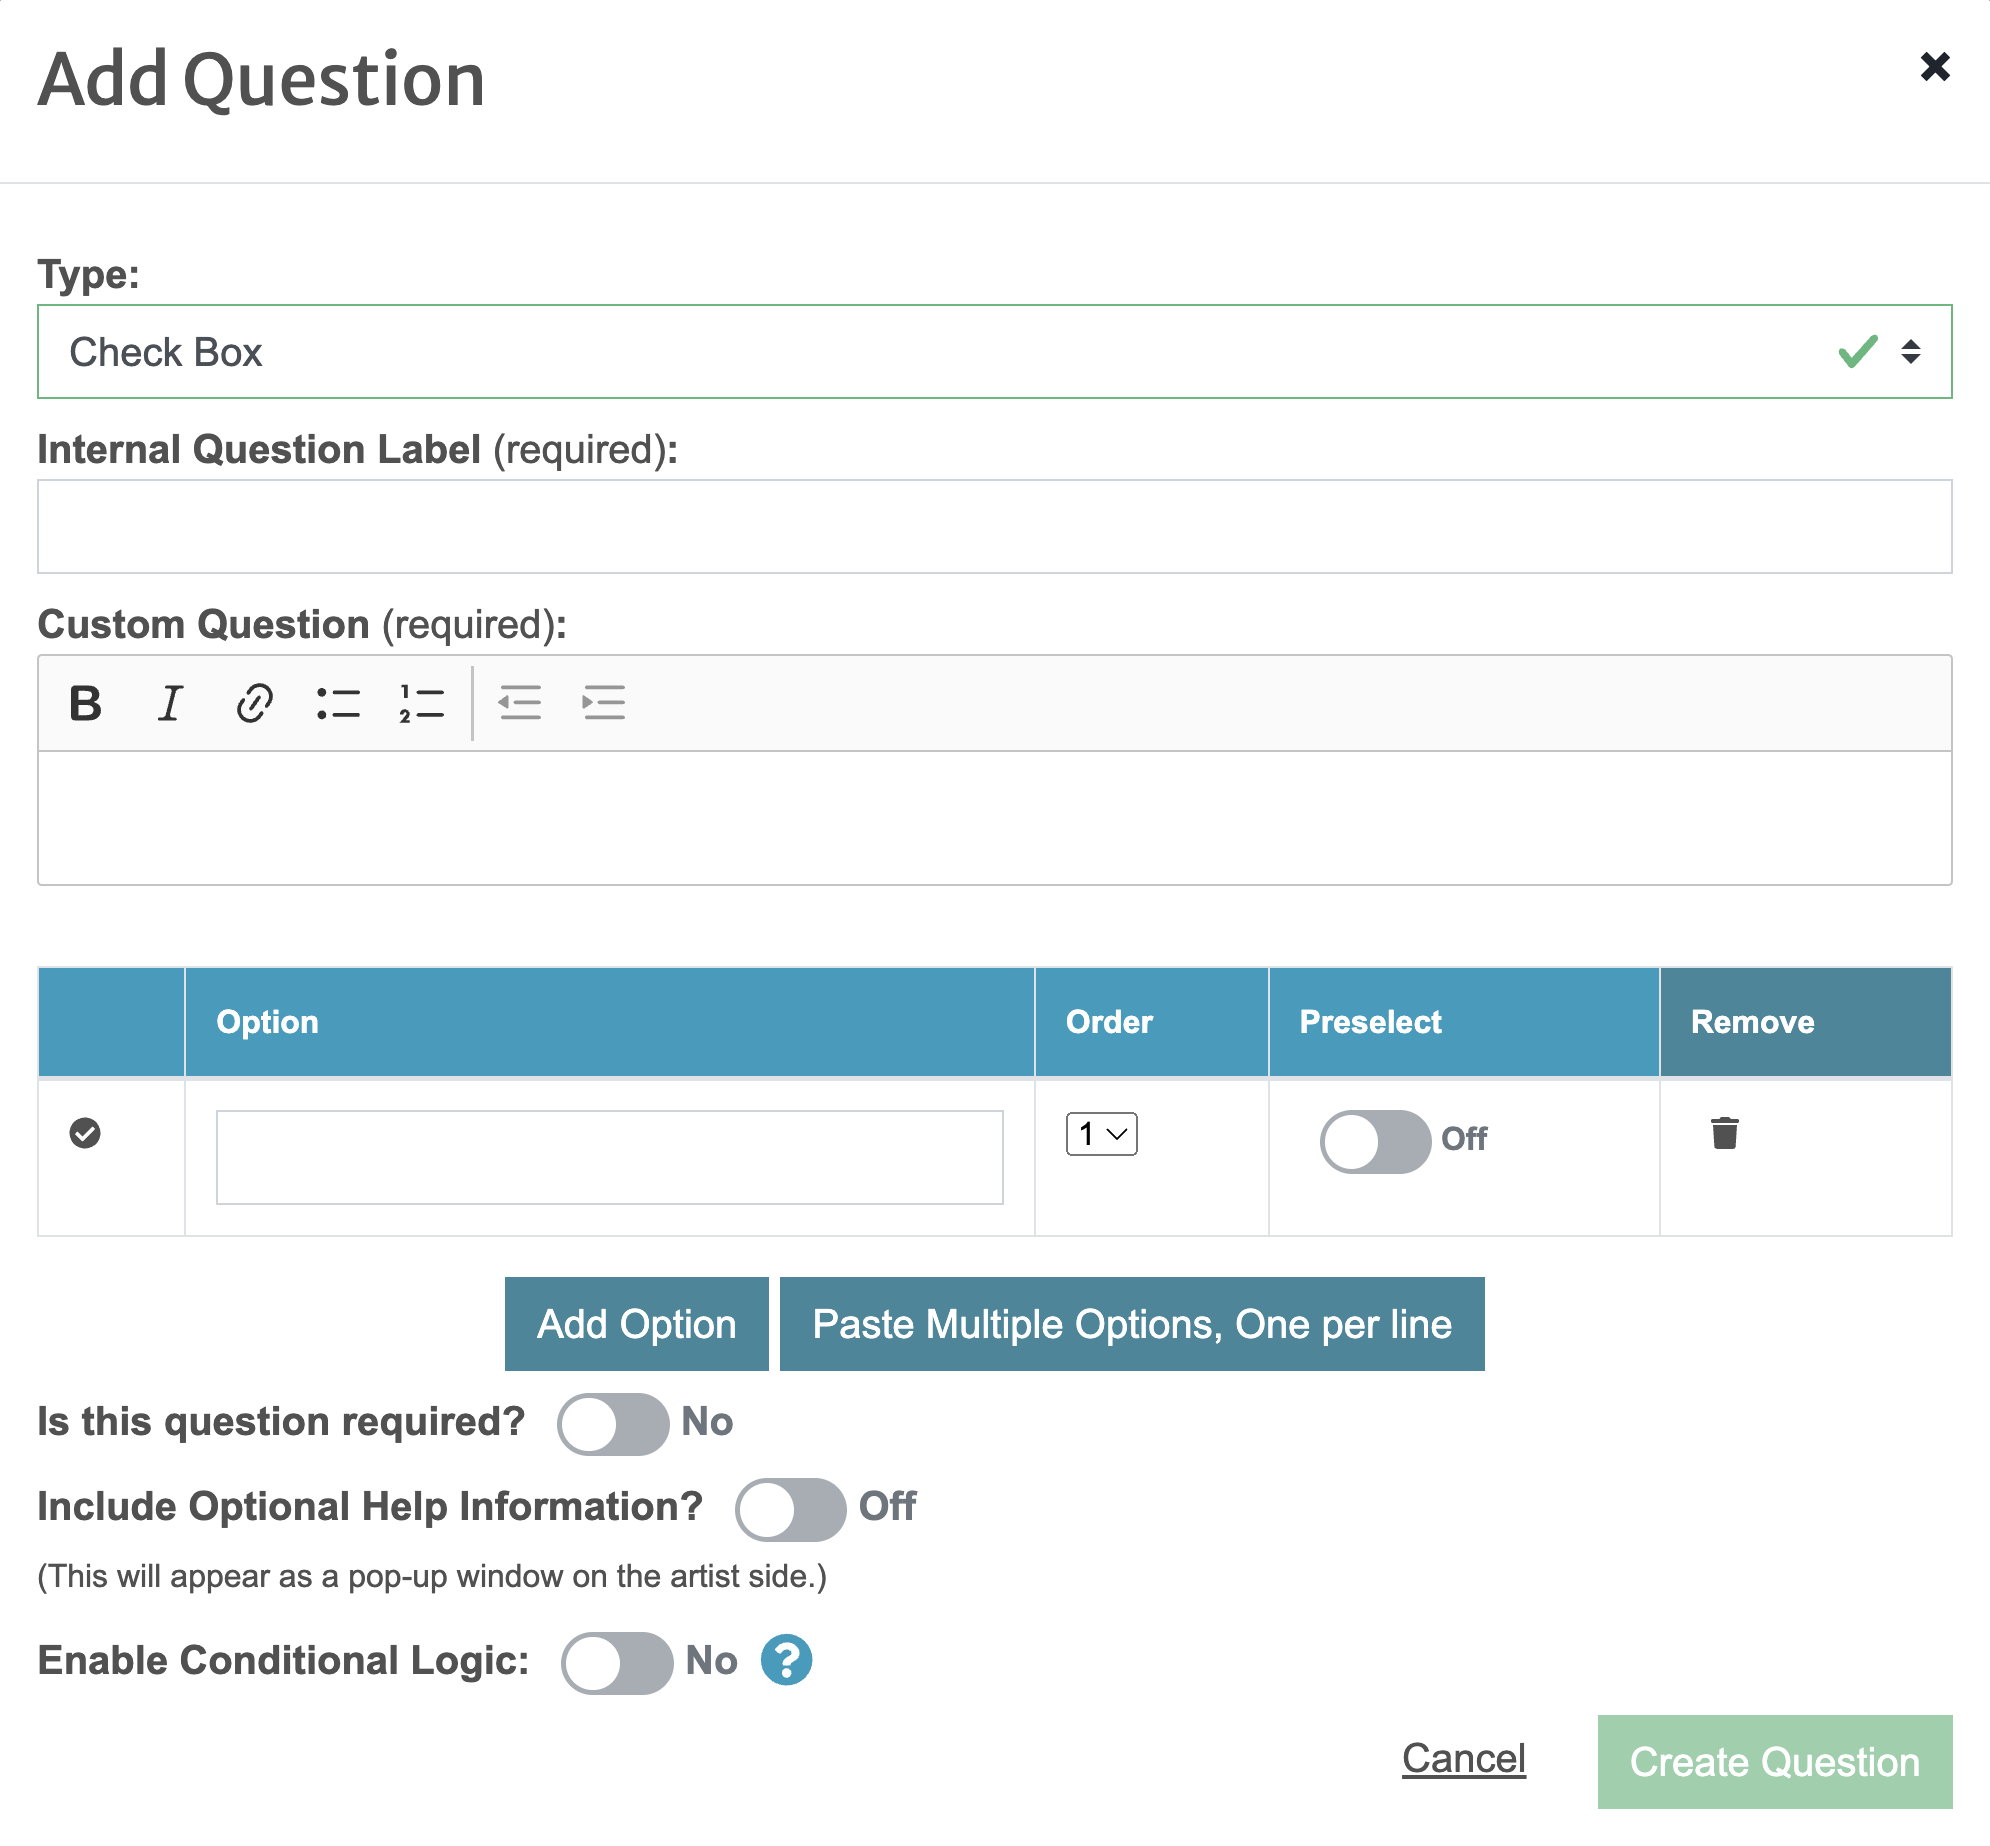
- Click Build New Question.
- Choose the question type from the drop-down menu.
Hover over the blue (+) icons to view the details of each field:
Applicants type their answers in a text box.
Applicants upload a file of 2MB or less. (Accepted file types: File can not exceed 2 MB and must be .txt, .pdf, .doc, .docx, .xls, or .jpg format)
Applicants select one or more answers from a list.
Applicants select only one answer to a question. This is good for yes/no questions.
Applicants select one answer from several possible answers.
Instructional, read-only text that does not require an answer.
Applicants select one or more answers from a dropdown list. Particularly useful for questions that have a long list of answer options.
- Fill out the required fields applicable to the question type.
- Internal Title: This is the question title. It will not be seen by the applicants.
- Maximum Character Limit (including spaces): Set a character limit for the applicant’s answer. Only available for text type questions.
- Custom Question: This is where you enter your question that will display to applicants.
- Options: Only available for multiple select question types.
- To add answer options individually, click Add Option and enter the first option in the blank field. Repeat the process for as many answer options as you need.
- To add answer options in bulk, click Paste Multiple Options, One per line, and paste your list of answer options into the text box that appears. Ensure each option is separated by a line break. Click Create Options to generate the answer options.
- Is this question required? Toggle to Yes to make the question required for all applicants.
- Include Optional Help Information?: Toggle to On and enter additional instructions for applicants in the text box. This will appear on the application as a help bubble.
- Enable Conditional Logic: Toggle to On to enable conditional logic and set up the conditions for this question. Learn more about building conditional logic questions below.
- Once you fill out the applicable fields, click Create Question.
- To edit an existing question, click the pencil icon.
- To remove a question, click the trash icon.
- To reorder the custom form questions, click on a question from the table and drag it to the desired location in the list. Click Update Question Order.
- Click Preview Call to view the application as it will appear to the applicants and ensure your custom questions are set up properly.
TIP: CaFÉ already collects artists’ contact information (name, email address, etc.) and the work sample details (title, medium, dimensions, etc.) so you do not have to create custom form questions to collect this information.
Learn additional information and tips for setting up your application by watching our Build a Better Application webinar!
Building Questions with Conditional Logic
Conditional logic allows you to create questions that display or hide based on an applicant’s response to another question.
For example: Let’s say you have specific questions for member applicants only. First, you will build a question that asks applicants, “Are you a member?” If an applicant selects “Yes, I am a member,” the additional question you create will appear on the application form. If an applicant selects “No, I am not a member,” the additional question will remain hidden.
How to Build a Question with Conditional Logic:
1. Create the first question on the application. Ex: Are you a member? (Yes, I am a member/No, I am not a member)
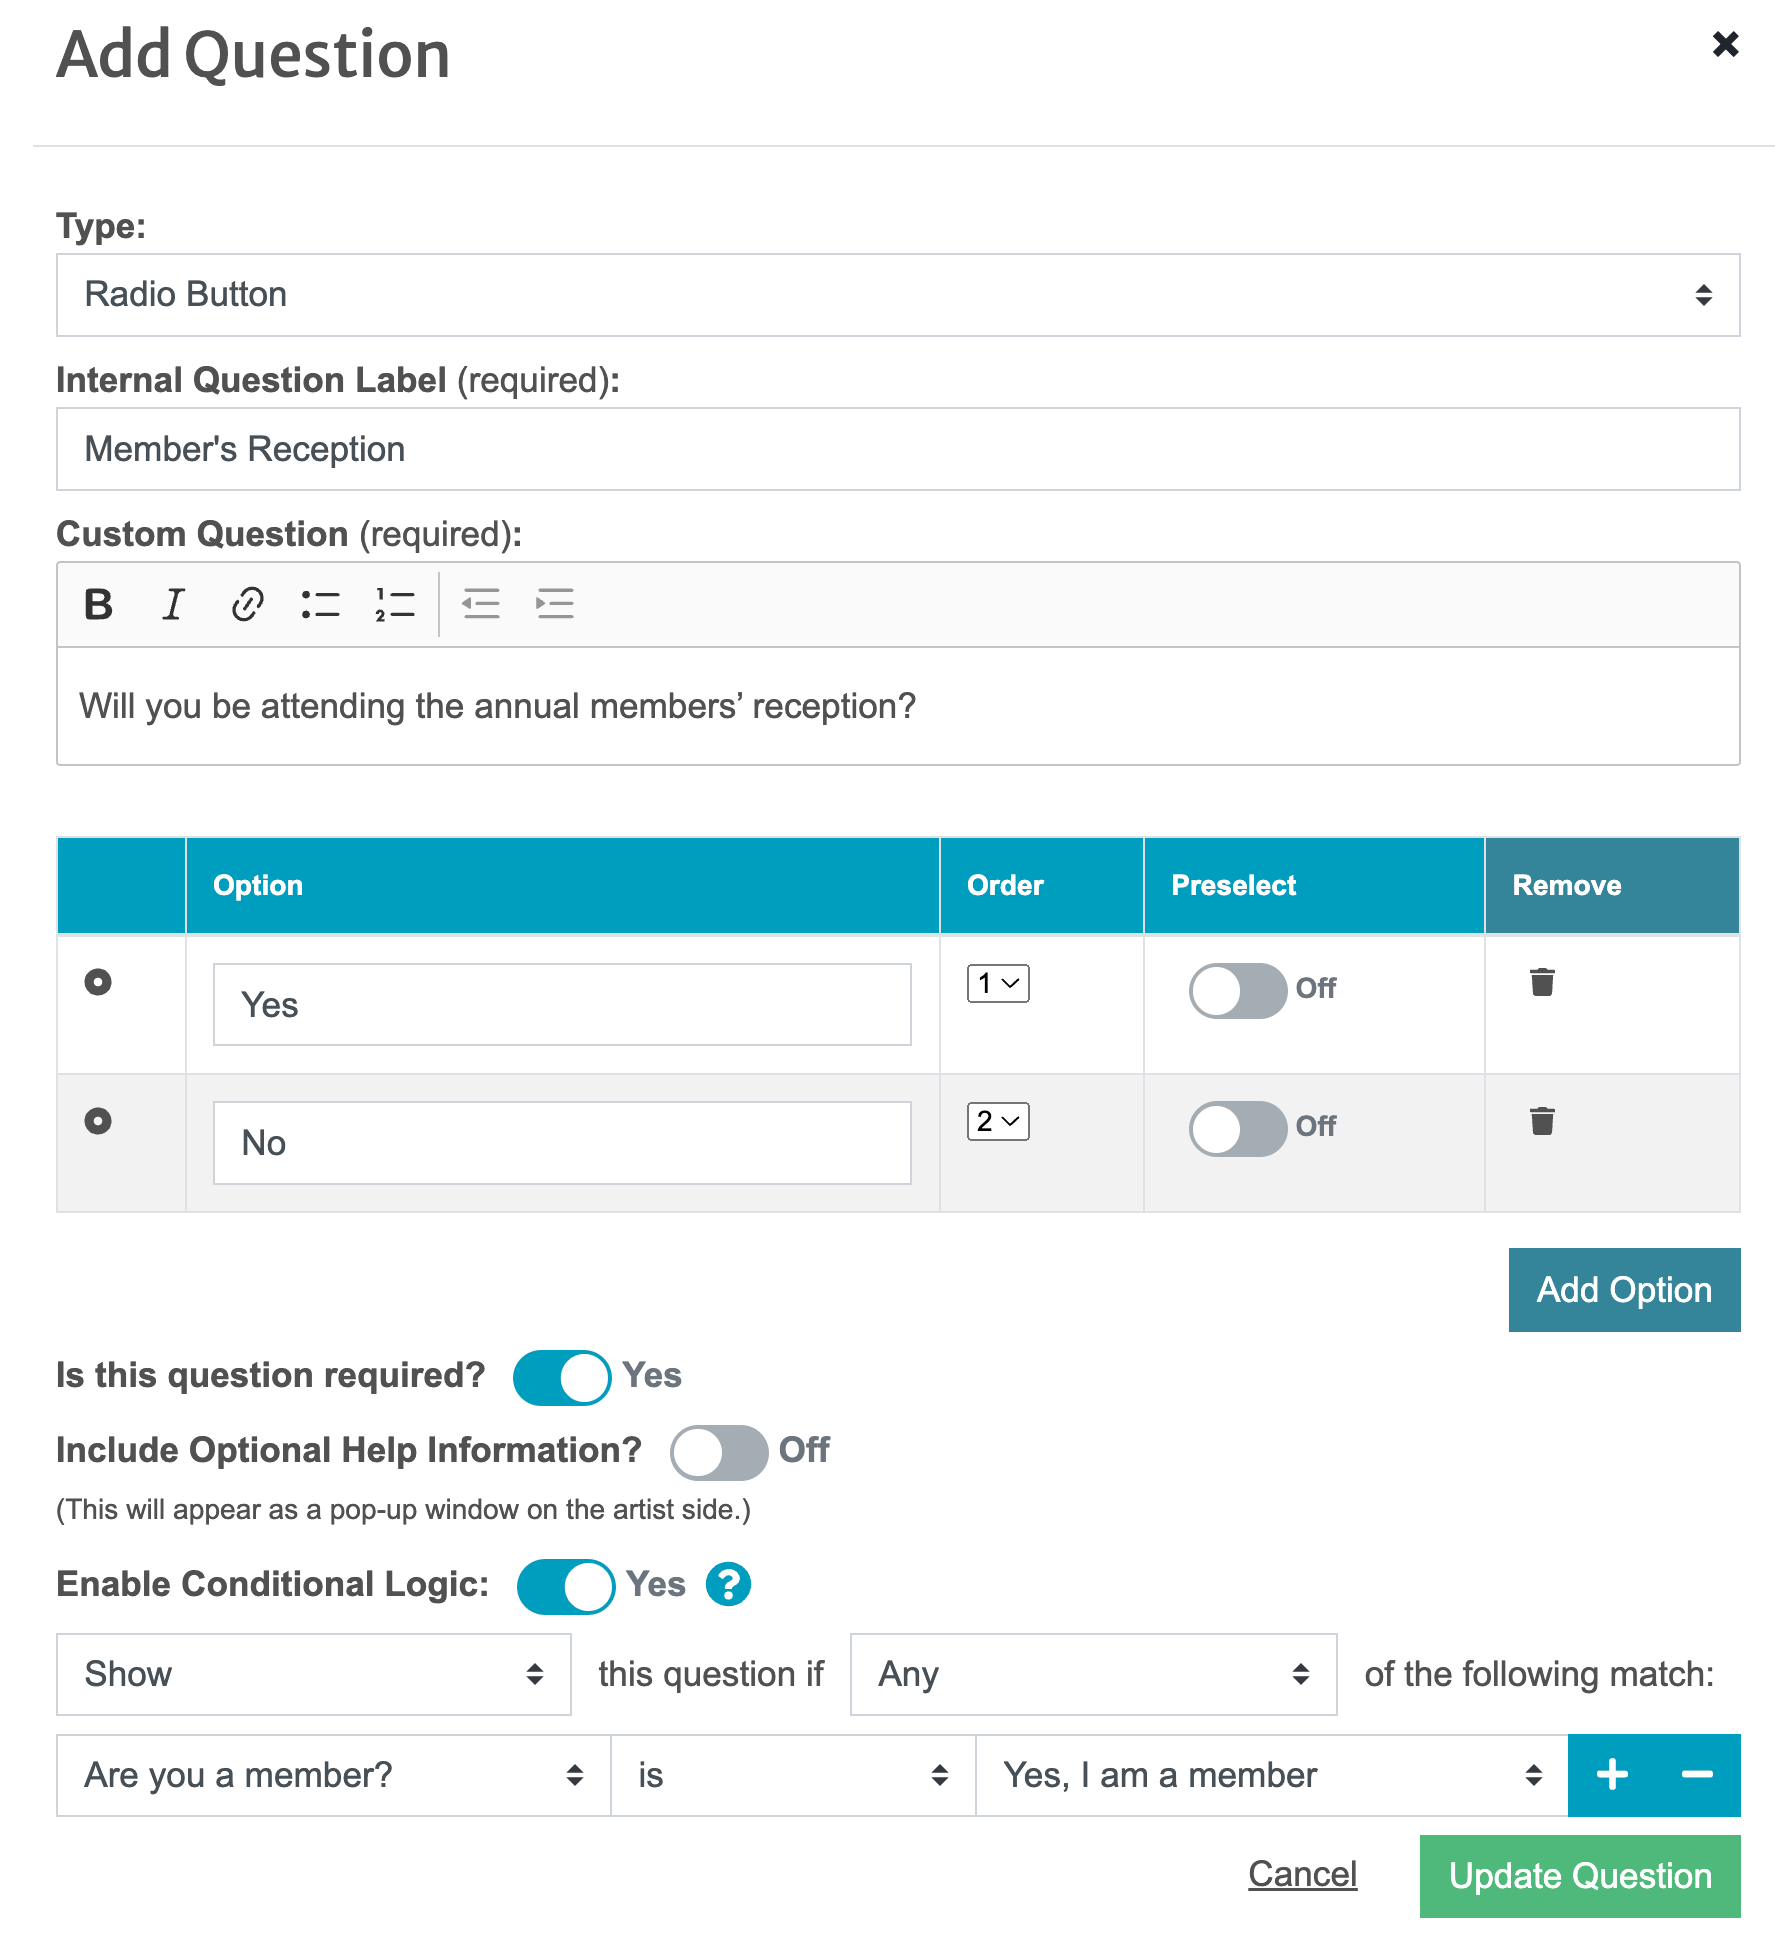
2. Create a new question you want to ask based on the applicant’s answer to the previous question. Ex: Will you be attending the annual members’ reception? (Yes/No)
3. On this new question, set the Enable Conditional Logic setting to On.
4. Choose from the options below to determine how the conditional logic will work:
- Show/Hide: This field determines how and when the question will appear on the application form.
-
- Show: Choose this if you want your question to not display on the application form until the criteria has been met.
- Hide: Choose this if you want your question to display on the application form unless the criteria has been met.
- Any/All: This field determines how the criteria must be met so the question appears on the application form.
- Any: Choose this option so that the question shows/hides if at least one of the rules created in the next step is met.
- All: Choose this option so that the question only shows/hides if all rules created are met.
5. Click Add New Rule and create the rule that must be met to show/hide this question:
- Select a Question: Select the question applicants will answer first. Ex: Are you a member?
- Contains/Is/Is Not: Select whether the answer given by the applicant that will trigger the new question is, is not, or contains the answer you choose in the next step. Important: If you’re creating a question that is triggered by two answers to the previous question, choose the contain option.
- Select an Answer: Select the answer that the rule is assigned to. Ex: Yes, I am a member.
Toggle to On to enable conditional logic.
Click the plus (+) sign to add a rule. Click the subtract (-) sign to remove a rule.
Choose show if you want your question to not display until the criteria has been met. Choose hide if you want your question to display unless the criteria has been met.
Choose the question that the applicants will answer first.
Select whether the answer that will trigger the new question is, is not, or contains the answer you choose in the next option.
Choose the Any option so that the question shows/hides if at least one of the rules is met. Choose the All option so that the question only shows/hides if all rules are met.
Select the answer that will trigger the new question to show/hide.
In our example, our rule will read:
[Show] this question if [Any] of the following match:
[Are you a member?] [is] [Yes, I am a member].
6. Click the add (+) button to add a rule. Click the subtract (-) button to remove a rule.
7. Once your question is built and the conditional logic rules are set up, click Create Question.
8. Click Preview Call to review the application as it will appear to the artist. You can test your conditional logic question by answering the first question to meet the criteria and ensuring the additional question shows/hides as intended.
Product Editor
How to Set up Entry Fees
1. Locate the Call Editor – Product Editor tab.
- Select Events then Management from the menu.
- Choose your call in the Current Events drop-down menu.
- Click Call Editor.
- Click on the Product Editor tab.
2. Enter your entry fee product(s).
Fill out the empty fields to add a product.
Hover over the blue (+) icons to view the details of each field:
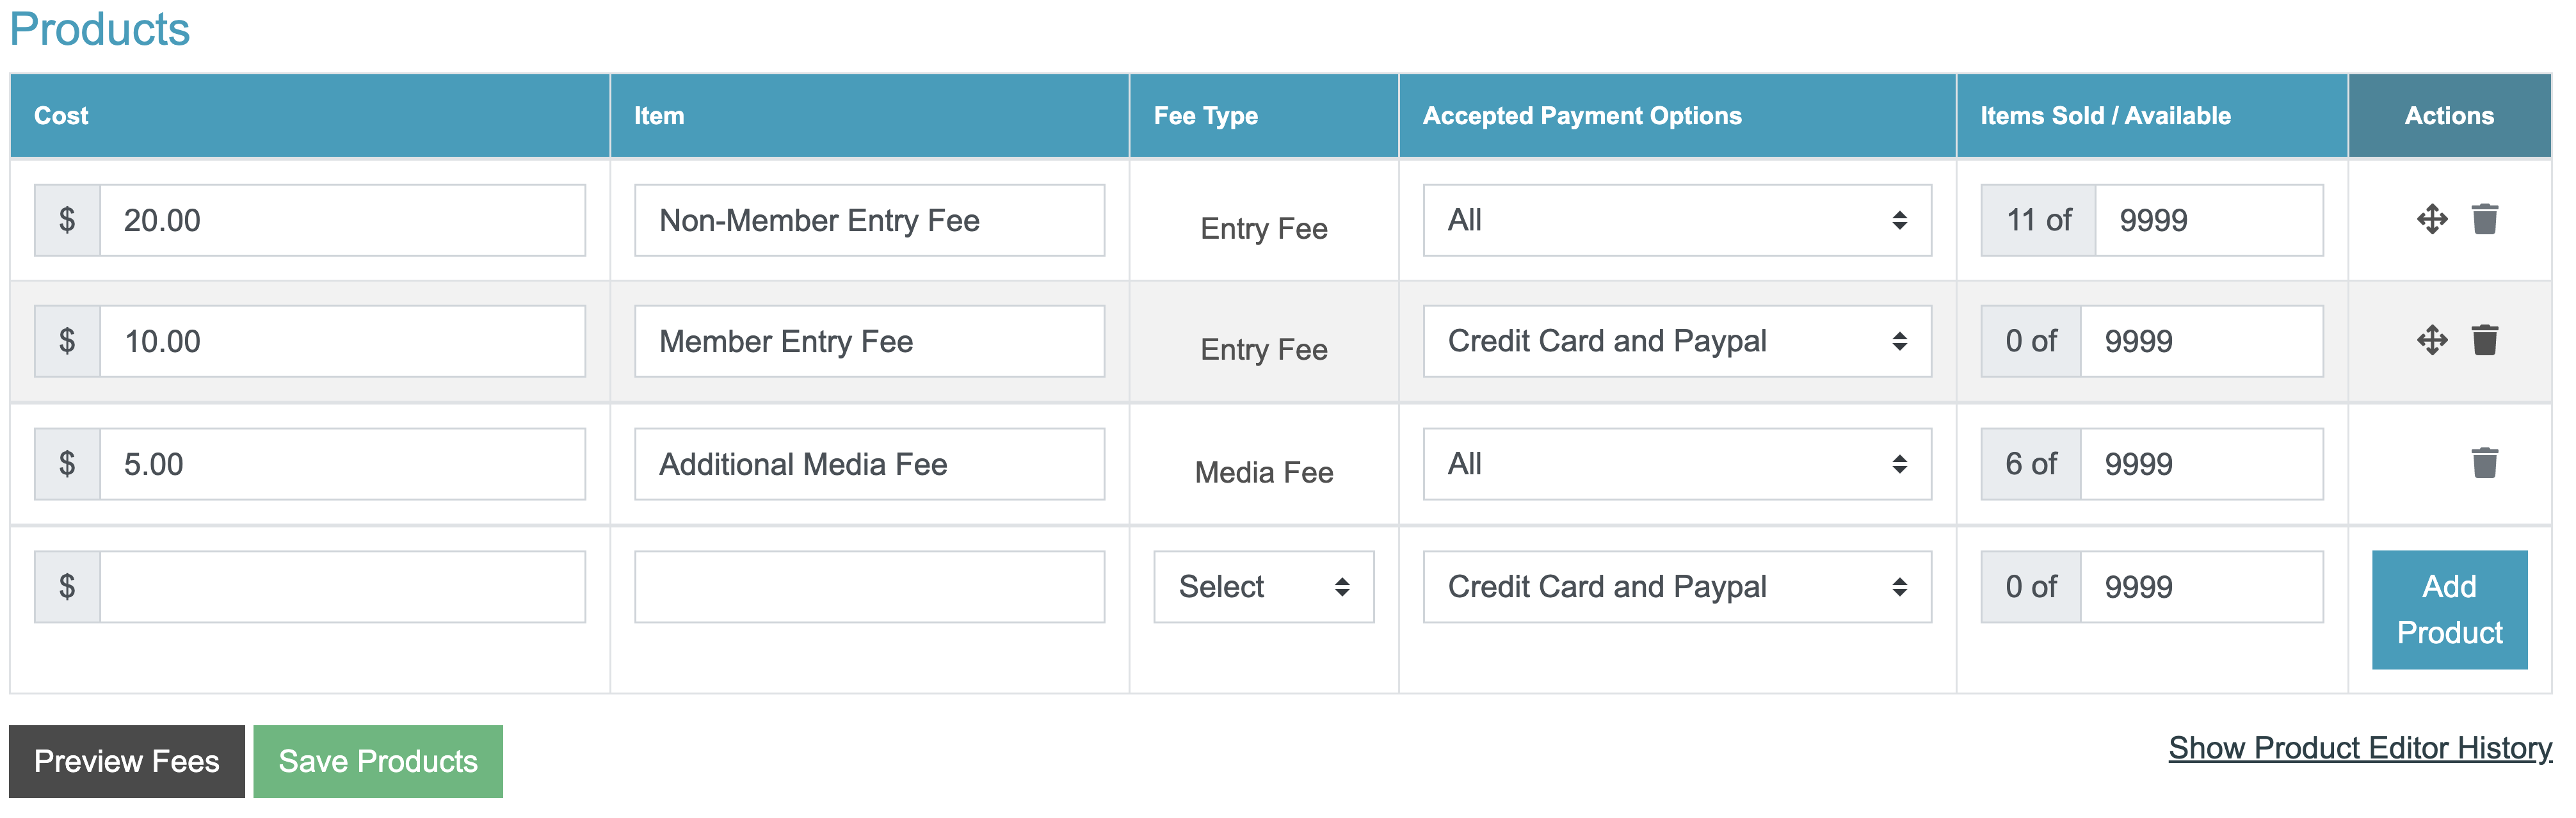
Enter the base entry fee or cost to apply. Payments are made in US Dollars only. Enter 0.00 if you don’t charge an entry fee to apply.
Describe what the fee is for (e.g. Art Show Entry Fee).
Choose the applicable fee type for your product.
Choose Credit Card (Visa/ MC) and Paypal, Check, or All to select how artists can pay their fees. Credit card transactions are processed by CaFÉ. For payment by check, you must provide a mailing address on the Product Editor page.
Keep the available quantity at 9,999 to accept an unlimited number of transactions. Decrease the available quantity if you need to lower the cap on the number of applicants.
- Choose the correct Fee Type.
- Entry Fee: Required product that artists must purchase in order to submit their entry. If you do not charge an entry fee, set your cost to $0.00. Add no more than two entry fees.
- Media Fee: Available to Scoring by Art (Jury by Artwork) calls only. Media fee will be applied toward each additional work sample above the minimum work sample requirement. (e.g. $10 for 1 minimum work sample, $5 for each additional work sample up to the maximum.)
- Admin: Optional product available for purchase at the same time as the entry fee (e.g. color catalog).
- Other: Only to be used with the Confirmation Deadline feature. Enter the cost of the participation fee that invited artists must purchase by the confirmation deadline.
IMPORTANT: The base Entry Fee is set for the minimum quantity of images allowed and cannot be based on allowing a range of images. For example, you can charge $35 for 3 images, and $5 for each additional image, but you cannot charge $35 for 1 to 3 images, and $5 each additional image. Questions? Email the CaFÉ team at cafehelp@westaf.org.
3. Verify the product details and save changes.
- Click Add Product to save changes and add the fee to your list of products.
- Click the move icon and drag the product to change the order the products will appear on the checkout page. Note: Only products of the same fee type can be re-ordered.
- Click the trash icon to delete existing products. Note: Products cannot be deleted once purchased.
- Click Save Products to save changes made to your products.
- TIP: Click Preview Fees to see how your products will appear on the Call Details page.
4. If you accept check payments, enter your Mailing Address.
- Click Save Mailing Address to save changes.
- Applicants will enter the check number on the checkout page and mail it to this address. Their application will be moved to the Awaiting Payment by Check status.
How to Create a Coupon Code
1. Locate the Coupon Manager.
- Go to the Call Editor – Product Editor tab and click Create Coupon OR select Events then Coupons from the menu.
- Choose your call in the Current Events drop-down menu.
2. Enter your coupon details.
- Fill out the empty fields to add a product.
- Each coupon code must be unique, 4-12 characters long, and cannot include spaces or symbols.
- The coupon can discount the cost of the product by a percentage or subtract a set dollar amount.
- Coupon codes may start at any time that your application is open and expire on the selected date at 11:59 p.m. MT.
Hover over the blue (+) icons to view the details of each field:

Enter a label that will only be seen internally to describe the purpose of the coupon.
Enter the amount (dollar or percentage) of the discount.
Choose the type of discount for your coupon (dollar or percent).
Enter the coupon code applicants will enter on the checkout page. Each coupon code must be unique, 4-12 characters long, and cannot include spaces or symbols.
Set the starting date your coupon code can be used.
Set the date your coupon code will expire. Coupon codes expire on the date you select at 11:59 p.m. Mountain Time.
Set the status to Enabled to allow applicants to use the coupon code between the selected Start and Expiration dates. If set to Disabled, applicants will not be able to use the coupon code.
Choose the product(s) you want to discount (e.g. Entry Fee or Additional Media Fee). The products match the item names listed in the product editor. Note: Discounts to the Media Fee type will be applied to the overall media fee total, not each number of media fees purchased.
3. Verify the coupon details and save changes.
- Click Add to save the coupon details and add it to your list of coupons.
- Click Save to save changes to existing coupons.
- Click Go to Product Editor to view a read-only list of your coupons.
Publishing Your Call
How to Publish Your Call
1. Locate the Call Editor.
- Select Events then Management from the menu on the left hand side of your screen.
- Choose your call in the Current Events drop-down menu and then click the green Call Editor button.
2. Click Publish Call in the Status section.
3. Click Send Publish Request.
Note: If your Call Status is set to Pending, we are still awaiting payment for the call. You must submit payment before we can publish your call (does not apply to prepaid or auto-deducted fees).
4. The CaFÉ team will review your call details and application to ensure artists will be able to apply.
- Requests are usually addressed within 1 business day during normal hours, 8:30 a.m. to 5 p.m. Monday — Friday. Please give yourself enough time to edit your call details so it can be published by your intended date.
5. We will notify you when your call is published.
- The Call Status will be updated to Published.
- Note: Even if your call is published, artists will not be able to apply until your Accept Applications date.